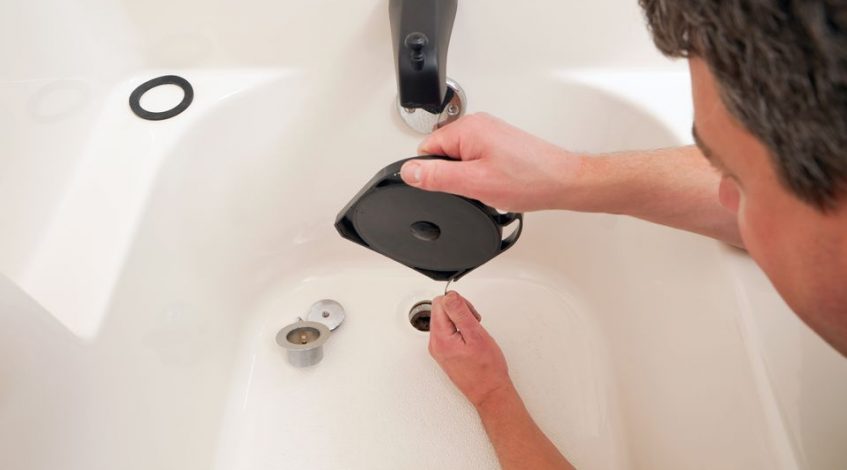
Also called the drain auger, a drain snake is designed for reaching into pipes to get rid of obstructions and build up capable of leading to blockages. We can also describe it as the intermediate between the conventional plungers and the more specialised machines for blockage removals.
So, a blockage that is too difficult to remove using a plunger can be removed easily using a drain snake. It’s a vital plumbing tool we should keep for DIY drain unblocking.
As advanced as they are, snakes are also known to come with more risks, especially when they are not used the right way. From leaks to breakage, the results of improper use of snakes are numerous. Hence, it is vital to understand how the device works before you use it.
This article will help you to get familiar with how to use a drain snake.
What does it do?
What you have in a drain snake is a long flexible metal cable alongside an uncoiled spring or a small auger and a handle on either side. We can liken the auger to a corkscrew or a drill bit. The length of a drain snake is from 3 to 15 meters and it is usually coiled when not in use. They are hand-operated, and the handles can be rotated most times.
To use a drain snake, you must get it into the drain directly so that it reaches and removes the blockage causing the clog. The auger end goes into the drain, and once it is inside, you start to uncoil the length by rotating the handle. Uncoiling further increases the length and the reach of the auger in the drainpipe, until it gets to the blockage.
How do you use a drain snake?
In this example we’ll cover how to snake a sink drain, but the same applies to snake a shower drain or bathtub.
1. The first step is to wear some clothes you can afford to get messy. Also, lay some old towels under the pipe you want to unclog. This is in preparation for the possible mess you may be exposed to, especially if you are going to remove the p-trap in the process.
2. Although it is not mandatory, removing the p-trap could make things easier for you. Also known as the p-bend, you will find this curving piece of pipe right under the sink. The role of a p-trap is to link the sink with the greater drainpipe system in the house. The curve is necessary so that sewer gases do not rise through the sink and find their way into your house causing smelly drains. They can either be metallic or made from PVC pipe.
So, if you want to remove the p-trap manually, use an adjustable wrench or your hands. After detaching the p-trap, clean it out properly. The obstruction may lie in the p-trap sometimes, so watch out. If there are no obstructions, you may need to use the snake eventually.
3. This is also not compulsory. However, removing the trap arm can be helpful. The trap arm is the part of the pipe found between the wall pipe and the p-trap. Its role is to ensure that the p-trap stays in position. To remove the trap arm, unscrew the metal or plastic nut holding the trap arm to the wall. In cases where the arm is glued, avoid removing it. Where removable, clean the trap arm – the same way you cleaned the p-trap.
With the trap arm off, you are very close to the drain. Now you can look closely into the pipe to see if you find blockages. If there is any, remove it. Alternatively, use your snake to locate any.
4. To use the snake to locate the blockage, thread the auger head into the pipe. If the trap is still present, the head of the snake goes into the drain. Otherwise, it goes into the access point on the wall. If the tap is still in place, you should run cold water while snaking.
Avoid forcing the snake through the drain. This could damage the entrance of the drain or the pipe itself. Also, ensure that the length of the head and cable is right for the drain in question.
5. Now that the drain is inside the pipe start uncoiling it. Ensure that the handle is very close to the pipe entrance. Reduce the force as the slack of the auger increases. The rotation must be at a regular pace, avoid slowing down or over-speeding. Any pressure while the cable is passing through the pipe would most likely mean that you have reached the blockage.
6. Once the blockage has been reached, switch to a back-and-forth and up-and-down movement of the head. Be thorough in breaking up the blockage, while avoiding the walls of the pipe. You may need to re-adjust the snake if you hear any harsh noise.
7. Pull the snake out of the pipe once you feel like the auger is about to get stuck. You may be lucky to pull out the obstruction alongside. If not, proceed with the snaking until there is zero resistance, and you have uncoiled the entire length of the snake.
Now you can bring the snake out and re-fix the parts of the sink. Take a look at the auger head for some particles off the blockage. Also, re-fix the p-trap and trap arm.
8. Take a look at the sink. By now, the obstruction should be off and the drain free. If not, go over the snaking process again. However, note that over-snaking can damage the drains or pipes. A persistent blockage after a thorough snaking is a problem you should invite the pros to take a look at.
As you will realise, snaking a drain is a straightforward DIY process. You can snake a shower drain, sink drain or bathtub easily. You only need to get the use of the snake correctly, and you can fix the blockage issues perfectly. However, sometimes, it becomes impossible to get the blockage out using a snake. In such cases, call your local plumber to have a look. These professionals will come in with some advanced tools to inspect and clear blocked drains no matter how stubborn.


